Today, new vehicles hit the market much faster than ten years ago. This trend brings new challenges for the automotive industry, namely that vehicle development flow and turnaround times need optimization.
Having the right data at the right time has become a critical point in this process. Aligning data generated by multiple measurement devices remains a challenge in process optimization. The more systems there are in use, the higher the possibility of errors or downtime. The finger pointing between production stations that often follows is not only time-consuming but exhausting. Manufacturers need a measurement solution that fulfills tasks throughout the whole process and, at the same time, maintains data integrity. Going digital with optical laser-based measurement systems allows for the storage and sharing of crucial data across platforms, bringing a lot of advantages.
Checking fixtures
The dimensional quality assurance of car components is crucial for product integrity and production efficiency. After all, imprecision and deviations will lead to misalignment in the assembly process. Thus, checking fixtures is an important step in production processes to detect such imprecision so they can be taken care of at reworking stations. But checking fixtures remains a labor-intensive task, especially when using feeler gauges. On top of that, analog measurements may lead to imprecise and user-dependent results as well as possible mistakes due to transcribing errors by the operator.
Optical measurement systems, on the other hand, deliver operator-independent and better traceable results for checking fixtures, thus providing deeper insight into your production process.
By checking fixtures with digital measurement solutions, results can be saved as reference and used for production optimization, e.g. by enhancing throughput. Another advantage is that it is less labor-intensive because digital measurement devices are much easier to handle and measurements can be performed much faster.
Additionally, the manual work after the measurement is minimized. After all, operators don’t have to write down results on a sheet of paper, transcribe it to the computer and start to manually analyze the data. With digital measurement solutions the software of the device will take care of the data storage, retrieval and comparison.
Hem edges
Once the part is assembled, the hem edge points are critical for the final fit. Critical matching points and possible deviations need to be identified quickly in the hem area to avoid any delays in the production process. Digital optical measurement solutions offer fast measurement and reliable results.
Having the ability to measure the flush and gap point at the single component level can provide invaluable information at an early stage of the process. The sooner a problem is detected, the earlier it can be resolved, reducing scrap and the impact of any problems on the process as a whole.
Fitting fixtures
Via a fixture, the fitting of the different components to one another is simulated. When assembling the parts on the special fixture, each component is located based on the car coordinate position. Measuring flush and gap on these components provides insight on actual build conditions and required adjustments. The data that is generated here is important for later tasks, e.g. reworking stations. Thus cross-platform solutions offer advantages because data once generated is stored and shared across the whole platform, making retrieval and analysis much easier.
CiW fit to BiW
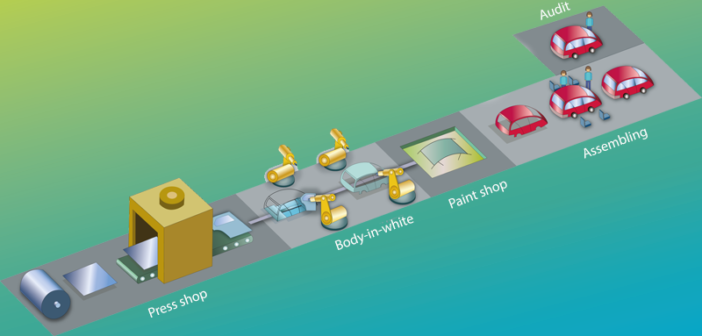
Early stages of fitting typically involve manual checks in the production line. Cross-platform measurement solutions integrate PLC into the line in order to load the proper measurement plan and provide the operator with real-time information on the quality of the assembly. If a part is not located properly, it is possible to reallocate the part or identify the error and deal with it at the next station.
Automated measurements
Whether you have an assembled BiW for inspection or a final stage vehicle, automated solutions provide fast and precise flush and gap measurement results. Those automated measurements are done much faster than analog measurements and therefore reduce labor time and costs. On top of that, automation reduces human errors and allows fast tracking and analysis of data across the whole platform.
100% part inspection
The integration of cross-platform solutions to your production line will lead to an inspection rate of 100 percent. All critical points during fitting and assembling will be measured and validated.
Considering the rising demands on the vehicle development flow that is visible in the market right now, the pressure on optimizing cycle time and processes is high. Cross-platform measurement offers a solution to those market requirements.
Auditing
Once a vehicle is assembled and painted, the finished car needs to be evaluated. In order to ensure the alignment of the car components and consequently the perceived quality of the car, a lot of flush and gap points are typically measured. This process is done offline. In this very last step, using the same measurement system as throughout the whole process (vetting, assembling and finishing) brings a lot of the benefits.
After all, evaluating measurement results of different systems will make it trickier to interpret the data in auditing. Deviations might appear that are not traceable or some errors are simply overlooked because they are associated with the use of different systems when, in fact, they could be indicators of a much deeper problem within the production line.
Summary
Data is the basis for everything – decision-making, process optimization, and high product quality. With Industry 4.0 and smart factories evolving, falling behind could be fatal for production lines. When so much time and effort is put into streamlining the production process, measurement processes can’t get left behind. A complete measurement system delivering reliable, reproducible and fast results is the most effective way to reduce your time to market and enhance overall vehicle quality.
Want more information about the right measurement system for you? Contact us to discuss with one of our experts.


